Our first cabinet was little more than a place to set our playfield in. Now that we had a working concept game, it was time to take it to the next level and build a working prototype machine. We took some measurements and came to the conclusion that our cabinet would have to be 4 inches deeper than the original Contact Master cabinet to accommodate our modern mechanical devices. The added depth would also make it look a bit more like a modern pinball machine. Jose was set to the task of building our new cabinet.

Meanwhile, we started looking into acquiring original music tracks for our game. Scott Dansei was kind enough to give us permission to use 3 of his original breakbeat compositions; Symphony 95, Manufacture, and Get Ready To Wake Up. Another track, Swords of Lionman, was submitted by Adam Hendrickson. It was written in the style of the original Swords Of Fury theme music. A 5th musical track was arranged in a mixer/keyboard device called the DJXII. It’s hard to describe the exact process of composition when using this machine, but the end result is a musical track called Love Theme From SGM. The final track, a 70’s white boy funk loop called Keep Your Eye On The SGM was submitted by Matt Mickelsen (http://www.matthewmickelsen.com/). You can listen to this track here – https://soundcloud.com/matthewmickelsen/scoregasm-theme
Access to the inside of the cabinet is from the rear, somewhat like the original. However, Contact Master required the removal of screws to gain access and we felt that today’s customer would not be too keen on that. We changed access to a rear panel that is held in place by 2 locks. We felt this was more *pinball* than dealing with screws every time you wanted to get inside the machine. After spending a few evenings coming up with several different ideas, Andrew and I finally arrived at a final version that both of us felt was a considerable improvement over the original Contact Master design.


One of the main playing strategies of SGM is loading and firing the solenoid action vertical up kicker mechanisms. These two mechanisms require surprisingly tight tolerances. No existing bell armatures worked correctly for our purposes, so we ended up modifying one by 3D printing a cone shaped tip for it. Several revisions were required to achieve the desired result. The end result turned out to be more reliable than the original machine.
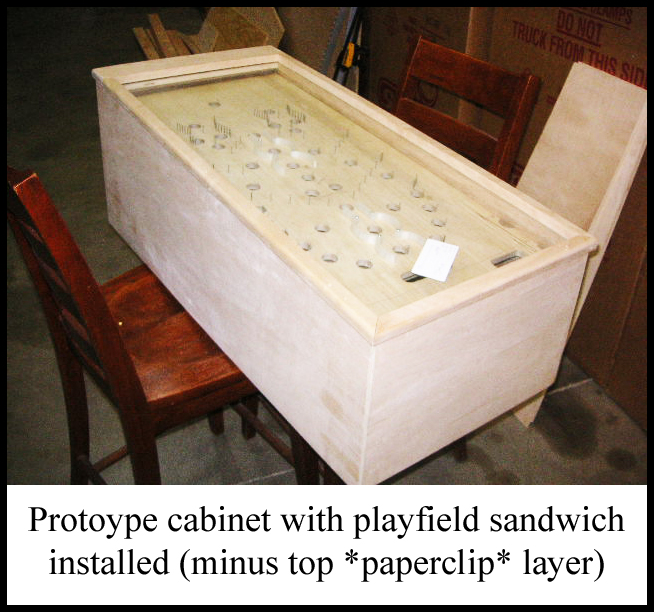
Our first *playfield sandwich* (discussed in blog entry A Proof Of Concept) was a very rough first attempt. Every layer except for the upper playfield was made by Jose in house on very basic woodworking equipment. For our prototype machine we would need to refine it considerably. We made some revisions to the drawings and sent them to Paul at VirtuaPin (http://virtuapin.net/) for manufacturing. Paul shut down operations to focus on getting all the required parts produced for us in a single day. This was no easy task壯陽藥
as he had no samples to refer to, only drawings. The playfield sandwich is composed of 4 interlocking layers of wood as well as 2 side blocks that hold the whole thing together. Each piece relies on the other pieces to work correctly, so if one piece is out of tolerance the entire thing does not function properly. Pin games are quite a lot simpler than modern pinball except in this one respect; the layered playfield is much more complex. Because of Paul’s dedication to the project we quickly had all the elements in place needed to assemble the prototype playifeld sandwich. This version worked much better than our first! Only a few tweaks would be required for production.
As much as we wanted to use traditional steel pinball machine legs (read – EASY), they just didn’t look right on our machine. We decided they would have to be made of wood just like bagatelle machine legs have traditionally been made of in the past. Dennis Nordman stopped by a couple of different times and gave us good input on how they should look. In the end we came up with a art deco inspired design the truly fits the style and era of both the original Contact Master and our modern ScoreGasm Master. Dino made a brushed stainless steel outer bolt plate that accented the leg nicely.


Now that we had our prototype playfield in our prototype cabinet, it was time to refine and install the shooter assembly, lift mechanism, and playfield reset mechanism. Each one of these assemblies uses a traditional shooter rod, but each shooter rod is a different length and uses a different series of springs. Just about every possible combination of spring and shooter rod length was tried before we were happy with the results.
The work board (the electronic center of our machine) continued to get refined and updated. Andrew Barney worked with Mike Szewczyk at DK Pinball (http://www.dkpinball.com/DKWP/) to develop a couple custom boards. Scott Dansei worked with Robertsonics modifying the wav trigger board so that it would do the things we required it to do. Jeff Barney came by and consulted on our theory of operation. The wiring harnesses were revised and tweaked several times by Andrew for optimal efficiency.
The ball trough in SGM is a far cry from the modern ball trough. It is made entirely of wood and requires tight tolerances to prevent ball hang ups. No one alive has any experience making this highly specific ball trough because not a single one has been engineered for 75 years! After avoiding working on this particular piece of the puzzle for a couple of months, I finally rolled up my sleeves one night when I was all alone in the warehouse and tapped into my one semester of woodworking classes that I took back in high school and fabricated it. I was mildly surprised at the result; not the prettiest thing ever built, but 100% functional!

Even some of the smallest details took a lot of time. I spent 2 hours finding the perfect position for the rebound post! It is amazing how moving this post the slightest fraction of an inch drastically changes how the ball rebounds off of it. Being that this rebound is one of the most important elements of the required skill to play this game it had to be perfect, and it is!

It was important to all of us that the prototype machine was of a commercial grade. Andrew and I worked five days a week from around 5pm to 9pm all through November and December of 2014, and January of 2015. Occasionally Dino, Mike, Jeff, or Scott would stop by and lend a hand, and we utilized Jose and Alex when needed, but the lion’s share of the grunt work was footed my Andrew and myself; night after night, following a full day of work at our *real* jobs. After 3 months of labor we finally had a fully functioning prototype machine.

It was now time to turn our full attention to production manufacturing!