Now that we had a finished prototype, it was time to turn our attention to production. On January 30th, 2015, Andrew, Dino, Yancy, and I drove the prototype up to VirtuaPin Cabinets in Michigan.

Paul began work on the first production whitewood machine so that we could QC it and sign off on it in March. Once we signed off Paul could then start the full production run.
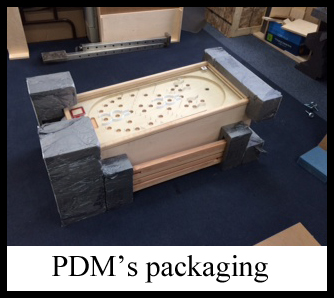
While the prototype was at VirtuaPin, Kevin from PDM (http://www.pdmfoam.com/index.html) took some measurements and began work on the packaging. The results were nothing short of spectacular.

 Back at Day One Pinball we assembled the 30 workboards that would be dropped into the cabinets once they were finished and back at our warehouse. The workboards are of a simple design, but being that they were made in house from scratch they were somewhat time consuming. The workboard wooden bases were laser etched by Andrew to stand as a permanent record of each game’s particulars.
 The wire harnesses for all 30 workboards were made and attached to their proper components and then wire managed onto the workboard along with their appropriate pieces.

Andrew designed and laser cut two different plastic protectors for the power supply and entry module so that people who don’t know any better would not electrocute themselves. After being laser cut, these plastics had to be heated and formed by hand using tools as primitive as our early ancestors used.

Once all the workboards were completed they needed to be QC’ed and tested. Andrew built a test rig that double checked our work and confirmed all the workboards to be operating properly.
 Andrew and I drove up to Michigan to see Paul at VirtuaPin on March 7th, 2015. The reason for our visit was to spend the day going over the first whitewood production game. This was an involved process that took all day. Each part of the cabinet and playfield sandwich had to be evaluated to make sure the game was ready for production.
 After some discussion the three of us deemed the reset playfield (also known as the baffle board) to be slightly too small. Paul tweaked the drawing and had his CNC router cut us the new and improved version minutes later.

 The lower playfield passed QC needing only a minor tweak to the VUK holes; they were slightly elongated. This would allow for more tolerance when installing the VUK mechanisms during the final phase of assembly in April.
 The upper playfleid and *paperclip* screwed together using the 2 dozen or so pre-drilled pilot hole guides. Everything fit together perfectly! We found that the paperclip would work better if it was a tad longer at the bottom arch; about 1/16″ of an inch. This got rid of a rare ball hang issue at the bottom out hole.

To insure that our mechanisms would have clearance while the playfield was being removed from the cabinet, we made a note to make the back access panel 1/8″ taller for the production run. This was the maximum we could enlarge the door or the back legs would end up encroaching on the door causing it to be difficult to open and close. Although this was a minor tweak, this extra little bit of tolerance would make the removal and replacement of the playfield much more user friendly.
 The interior of the new whitewood production machine was a much improved design over our original prototype machine. The bottom of the cabinet was increased in thickness from 1/2″ to 3/4″ to match the other 4 sides of the machine and to insure that our cabinet was of a commercial grade. The new ball trough was a much more professional looking affair in comparison to my gallant attempt on the prototype. The leg bolt holes were fashioned by a CNC router instead of hand drilled. This made for a clean, smooth look and fit. The shooter, lift, and reset mounting brackets were inset into the cabinet for a seamless finish and to insure that the playfield sandwich could slide completely to the inside front of the cabinet. The speaker mounts were rotated so the speaker sat at right angles to the cabinet’s interior sides. The front trim was rounded to allow for the painless nudging of the cabinet during game play.
 At the end of a long day we had made some small changes on the fly and had also composed a short list of tweaks we all felt would improve the function and form of the production machine.

After a quick group picture, Andrew and I headed back to Huntley and Paul headed off to bed for some much needed rest after 36 continuous hours of working!

Meanwhile, Scott finalized the firmware for the WAV trigger board. He also finished compiling all the original songs and call outs and installed them onto the mini SD cards. Andrew and he then installed everything into each workboard unit, QC’ing each component in the process. Luckily there were very few issues found. We ended up having to replace one audio cable and one WAV trigger board, as well as one mini-plug jack. Our workboards were now ready to drop into our cabinets once they arrived!
The decision was made to add a backbox speaker panel although the original Contact Master pin game did not have one. There were 3 reasons for this: 1. Tweeter speakers could now be used to add a nice high end tone to the background music. 2. A lit translite could be added to the machine. 3. The backbox speaker panel added an overall visual appeal to the game.
Several designs were drawn up, but the one we ended up with was this one, although the final version used a different joint method.

Paul made us a prototype and it turned out very nice.

We fashioned a quick mock up of the ScoreGasm logo backlit with red LEDs and made a few notes right on the front panel.

s.wordpress.com/2015/02/dmt-speaker-panel-mock-up.jpg?w=300&h=103″ alt=”KONICA MINOLTA DIGITAL CAMERA” width=”300″ height=”103″ />
The interior wired up quite nicely.

We then had Jon Youssi draw a mock up of what the backbox speaker panel would look like with his graphics applied.

Happy with the results, we signed off on the design and gave Paul at VirtuaPin the OK to move forward with the production backbox speaker panel units. We gave Charlie at Spooky Pinball the thumbs up to begin cutting and direct printing the acrylic logo translite panels.
Kevin at PDM called to let us know the production run of the custom boxes and interior packaging had been completed. Dino and I made the drive up to Michigan on March 19th, 2015 to pick it all up and drop it off at VirtuaPin’s warehouse.

While we were there we took the opportunity to check out the progress of the cabinet and playfield manufacturing. Paul was was in the final stages of building the ten engineering sample cabinets and had already sent the main playfields to Charlie at Spooky Pinball for printing. We made arrangements for Paul to deliver the units to Day One Pinball the following Wednesday.


When Dino and I returned from VirtuaPin there was an email from Charlie at Spooky Pinball waiting; the playfields were in production!


With the playfields and cabinets scheduled to arrive on Wednesday, March 25, we called for an assembly *party* on Tuesday, March 24th. Many key players showed up and pitched in.


By the end of the evening we felt like we had done some honest factory work and the results were worth it.

